Skip to content

Blog

Doing battle with a Dell R620 and Ubuntu

dell_poweredge_r620

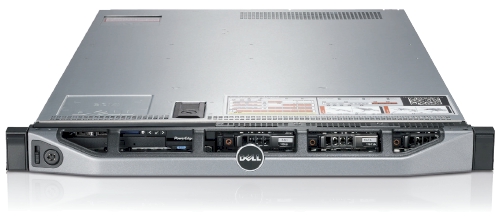
We recently got sent a Dell R620 to evaluate and while its technical specification is amazing there are a few things that need to be handled first.

As far as Ubuntu and the Dell R620 go, Precise (12.04) is the only way to go here. Every release before Precise has issues with this hardware in one way or another. This is new hardware of after all.

For our "use case" we downgraded the PERC H710P controller to a H310 controller so we can have direct access to the drives via pass-through. The H310 allows TRIM support for SSDs and SMART data via smartctl to be used without any problems. If you are interested in SMART information and PERC H700 series RAID controller, I posted about possible workarounds at Dell's customer support site.

Let's begin: USB Booting: try as we might, we could not get any usb stick to boot on the R620. We've gone through the iDRAC to do virtual drives and looked at BIOS/UEFI methods. The usb stick is recognized, but the R620 just shows us a blank screen. The same stick works in the R610, VM and other machines. We have a ticket with Dell support and they have yet to resolve the problem. Booting over PXE or CD/DVD are our only options at this point.

Bad MAC Addresses

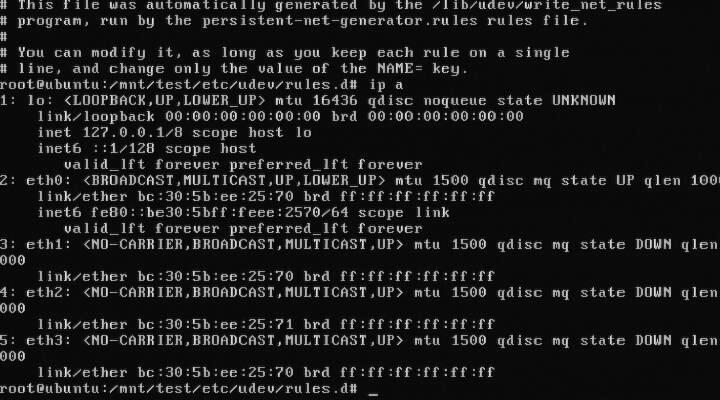
Intel® Ethernet Server Adapter I350-T4: The igb kernel module for 2.6.35 and 2.6.38 will detect this card and it will get you connectivity, but it will behave funny. For example, 3 to 4 ports will have the same MAC address. You need download, compile, and install the latest sources for the igb from Intel before you get full functionality out of your I350-T4. The other option is to install Ubuntu Precise (12.04) as the 3.2 kernel has the updated drivers from Intel.

DRHD: handling fault status reg: at some point during booting of a freshly installed Ubuntu with the 2.6.35 kernel, we ran into this error that would effectively loop endlessly and cause the R620 to become unresponsive. We got this:

DRHD INTR-REMAP problems

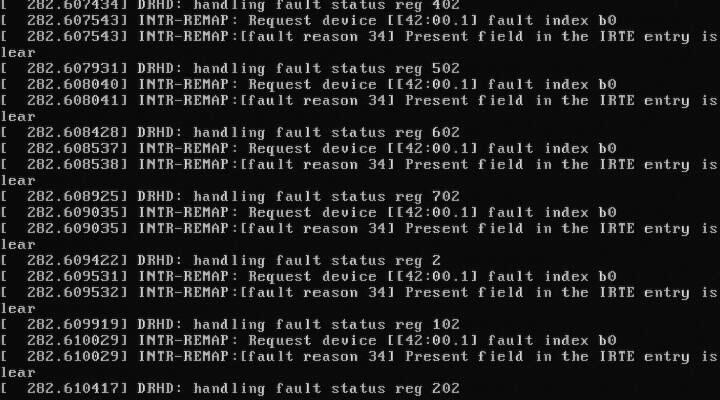
DRHD: handling fault status reg 502 INTR-REMAP: Request device[[42:00.1] fault index b0 INTR-REMAP:[] Present field in the IRTE entry is clear

and it would endlessly print that to the console. This apparently has something to do with the IO-MMU part of the kernel dealing with interrupt remapping. Whatever the problem was, it was fixed in the 2.6.38 kernel and caused no more problems.

Dell SSD: the SSDs are rebranded Samsung drives which do not support TRIM but are at least over provisioned. These drives have a problem with smartctl in that while there is SMART information, the drive itself doesn't (yet) exist in the drivedb.h file. You have to use the latest smartctl version (5.42) to get anything usefull out of the drive. Older versions give you things like this:

Log Sense failed, IE page

hdparm: and other tools like smartctl, lshw and others have issues when getting the required data from over the PERC H310, even if it is pass-through. You have to use the latest versions of each to even read the serial number off a HDD or SSD. Hdparm versions >= 9.37 work, otherwise you get this:

root@node:~# hdparm -I /dev/sda

/dev/sda: HDIO_DRIVE_CMD(identify) failed: Invalid exchange

Once we got all the little inconveniences out of the way, we got down to benchmarking and performance testing. In comparison to the Dell R610's 2x Xeon(R) E5606, the R620's 2x Xeon(R) CPU E5-2643 has double the CPU performance in our testing. The obvious bottleneck here are the 2x 2port 10Gbps NICs in that even at a theoretical max of 40Gbps, for our purposes, we would be network bound. Thankfully there is another PCI-Express available, just in case.

Finding and making a network subnet calculator

subnet ip calculator

Doing subnet calculations by hand can be tedious and thankfully there are tools available online to help with that. One in particular Subnet Calculator with a PHP backend was handy and compact.

I've sent a few requests asking if I could re-write it to be client side so that it could be used in intranet applications or even possibly be ported as an hand-held application. After a few months of waiting and no response, I repurposed some of their CSS and layout and wrote the javascript equivalent.

Mindwerks's Subnet Calculator

The code is released as open source and can be reused as per terms of the license. It is part of the WP-Mindwerks wordpress plugin, but you can use it also as a standalone webpage.

ipcalc

Switch your switch with switches

Switch

It is not unusual for me to find 10,000 Euro worth of networking equipment on my desk one day. It usually means that I have a long week of reading and testing ahead of me as I am the only person in the company, let alone building, that has ever seen or worked with these devices before. That means I am on my own aside from an Internet connection.

While your mileage may very, I've had the joy (and horror) of testing these devices as 'drop in replacements' to the test environment that we are using. In some instances, things just worked out of the box, however there are a few devices that needed to be poked a few times to get things moving.

Manufactures of routers and switches I have tested are:

  • Arista: We where able to test the Arista 7000 to validate it against our setup. Painless to install and without tweaking, handed Cisco's 3560-X it's hat. The latency (cut through as opposed to store and forward) helped and the overall throughput was great.
  • Brocade: SSE-X24S was a interesting 24 port 10Gbps switch, we where however unable to capture the same level of performance as the Arista.
  • Cisco: Tried and tested Cisco and their IOS that every switch tries to emulate. Everything we've tried to do with Cisco devices just worked. What is better is that they abandoned their serial and have gone USB. That cannot be said for the rest of the devices we've tested. We where limited to just 2 10G ports per 3560 switch, which is a shame.
  • Extreme Networks: After meeting with their technical sales people, they (twice) gave us the wrong equipment. We ask for 48 port 1Gbit (Cat5) with 4 10Gbps SFP+ switch and we received a 48 prt 1Gbit SFP which was later replaced with what we needed but with only 2 10Gbit SFP+. After a month of being unable to test their product(s) in our environment, we stopped dealing with Extreme Networks and their purple hardware.
  • Force10: lived up to its expectations as a force to be reckoned with. Nothing worked at first as all the ports are shutdown by default. You must first use a usb->serial->rollover cable to get in, 'no shutdown' your ports and then tell them they are 'switchports', at which point they should start switching packets. Same level of performance as the Arista, meaning that we could saturate our 10Gbps nics.
  • Interface Masters: the Niagara 2924-24TG switch was the latest to be tested and there isn't much information about them online. Their switches (24x 1Gbps and 24x 10Gbps) where comparable if slightly less performant than Force10. Their plus point was that they allow you to re-brand their products. We experienced hardware fault in their 10Gbps port, we used another port and continued testing. Their technical support was good but we never got to deep dive into why that one port had so many problems. They sent us a new switch to test and everything worked out.

There is also an issue with SFP+ cable length and Intel cards:

This issue has been witnessed at Intel's POC using 10Gbps Intel NIC and Arista DCS-7048T-A switch.

The INTEL LAN department has analyzed that there is a known issue with short SFP+ cables, leading to a flicker in the network signal. Apparently there needs to be a minimum length of 3m.

Replacing all 0.5 m cables with 3m cables solves the issue.

For those looking for some numbers and benchmarks, I'm not allowed to post the results. Needless to say, they are not far off from my experiences that I've listed above. I'm now a fan of Force10 being reliable and performant. Arista ranks up there as well and Interface Masters (a total unknown) can be competitive and allow for re-branding which is interesting for some companies.

Ubuntu 12.04 (Precise) and AMD Catalyst 12.4

glxgears

Precise Pangola has been released and a day later comes a new fglrx driver. While there isn't a changelog, this build apparently gives us:

early-look support for Ubuntu 12.04, Linux PowerXpress support for the Intel Ivy Bridge platform, packaging script updates, and various bug-fixes.

Among the bug-fixes for Catalyst 12.4 on Linux are: fixing some multi-head issues, a system hang in certain PowerXpress configurations, fixing a system hang when using OpenGL overlays, correcting an OpenGL performance drop, a soft-hang when killing the X Server, and severe corruption for OpenGL games using the AMD "Redwood" graphics processors.

If you want to build these for yourself then you can follow these instructions:

  1. Download 64-bit 12.4 from AMD
  2. Extract the files from the package: sh ./amd-driver-installer-12-4-x86.x86_64.run --extract ati
  3. Build your new ati/fglrx deb packages: ./ati-installer.sh 8.961 --buildpkg Ubuntu/precise
  4. Install our newly created deb packages: sudo dpkg -i ../fglrx*.deb
  5. If your /etc/X11/xorg.conf is missing you will need to run: sudo aticonfig --initial and then reboot.

That newly created package should work for 3.2 kernel series in Precise.

A poor man's https, using ssh to secure web traffic

HTTPS_Everywhere_new_logo

Sometimes you get a web-hosting environment that only serves non-ssl (http) content. If you need to do any type of management through tools like phpMyAdmin, then you can see the problem with this. All it would take is someone on your network or on the Internet to sniff the traffic and retrieve your username and password, then they too can do a bit of "management" on your site.

If you also have secure shell (SSH) access, then there is a way to manage your site securely by using SSH's venerable port forwarding (SOCKS). The trick is to tell your management tools to only listen or respond to connections coming in over SSH instead of normal traffic. First you need to set up your SSH connection and configure your browser to use your newly made SOCKS proxy. Please refer to my post about SSH Proxies for more information.

The second part is to secure your application to only accept connections from itself, which is where your browser requests travels through your secure tunnel. We can mask it a bit so that you will have to look hard to see that there is something of interest going on there. It will also be ignored by Google and other search engines.

You can add this to your php code: /* custom code to deny access to world */ if ($_SERVER["SERVER_ADDR"] != $_SERVER["REMOTE_ADDR"]){ header('HTTP/1.1 404 Not Found'); exit();

If the remote IP (your request) is not he same as the server IP, then we give the 404 error message in return, otherwise you get to your application.

SSH as a socks proxy

passwords

Recently there was a need to visit a US based website to verify some personal information. Apparently there are 'rules' about who is geographical allowed to get access to the site which means that a citizen of said country cannot access the site from outside of the US.

I will not get into the absurdity of such security mandates, instead we will go around the problem and get our information that bureaucracy tried to prevent.

The general idea is to use a proxy inside the US that will allow us to hop over the geographical firewall. I do not trust open proxies by default because of their ability to sniff traffic. I do however have access to a secure shell (SSH) in the US that I can use. Using this command: ssh -D 8080 [email protected]

will create a port 8080 on localhost (your computer). You can then use a web-browser like chrome from anywhere in the world and through an encrypted tunnel come out the other side on a network based in the US. You need to configure your web-browser to use a 'SOCKS Proxy' in order for this to work.

For chrome, it is easy as doing this: chrome --proxy-server="socks5://127.0.0.1:8080" or you can follow this guide to setting up chrome with socks.

To check that it is working, go to google and ask "What is my IP".

For more detailed information, here is the ssh man page:

Specifies a local “dynamic” application-level port forwarding. This works by allocating a socket to listen to port on the local side, optionally bound to the specified bind_address. Whenever a connection is made to this port, the connection is forwarded over the secure channel, and the application protocol is then used to determine where to connect to from the remote machine. Currently the SOCKS4 and SOCKS5 protocols are supported, and ssh will act as a SOCKS server.

Better password security through length

passwords

As comically seen on xkcd, a password's length is more important than its complexity. What we should take away from the comic is that short but hard to remember passwords are easiest to crack while long and easy to remember passwords are harder to crack.

Try for yourself with my online password cracking calculator.

As an example, we will compare two passwords: "Tr0ub4dor&3" and "correct horse battery staple". We will assume that a brute-force machine that can theoretically do 200,000,000 guesses per second, which is more pessimistic than a machine with four ATI HD 5970s at 22,400,000 guesses per second. It would take such a machine about 242,243,228 days to guess "Tr0ub4dor&3". It would take the latter password 9.62x10^41 days to guess. Now if law enforcement (or Anonymous) gets involved, you can expect some distributive computing to help increase the effectiveness of the attack. With a botnet of 100,000 computers with GPUs the first password goes to 86,515 days to crack while the later 3.436*10^36 days to guess.

We can only expect that with existing trends that hardware and software will become more efficient. The mathematics help prove a point, that short complex passwords are more easily cracked than long passwords. A long but easily remembered password is mathematically a safer bet.

Note of warning: Best practices with passwords still apply because of other attack vectors like dictionary attacks, common word compounding and mutations of words such as 0s for Os and other such substitutions.

Observation: Choose the first sentence of a random book and memorize it, punctuation and all. You should be safe for the immediate 10 years.

Asymmetric networking using Linux

asymmetric_network_icon

The idea is simple, two subnets (separate networks) and then route packets from one to the other. The environment, however, is not symmetric. We wanted to contact a node on the other subnet and we could see the packets travelling over the switch to the router back through another switch to the node, but the node itself refused to reply. Each node has two NICs and each NIC is connected to a separate network. If you try to connect or ping one node from another, Linux is smart enough to go directly over the NIC with the right network. If a NIC should ever fail, the failover is that the packets are then routed up one network to the router then over to the other network. The network looks something like this:

        ----(router)----
        |               |
        |               |
   | switch |__  __| switch |
        |      \/       |
        |      /\       |
        |     /  \      |
        |    x    \     |
   | node1 |/      \| node2 |

note: The x is the broken link.

Apparently when going from node1 to node2 is not the problem, node2 just does not respond. This has to do Reverse Path Filtering and per default is enabled in the Linux kernel. From the manual:

By default, routers route everything, even packets which 'obviously' don't belong on your network. A common example is private IP space escaping onto the internet. If you have an interface with a route of 195.96.96.0/24 to it, you do not expect packets from 212.64.94.1 to arrive there. ... Basically, if the reply to this packet wouldn't go out the interface this packet came in, then this is a bogus packet and should be ignored.

Armed with this new knowledge and acknowledging that this system will not be on an Internet route-able environment, we decided to turn off the filtering. for i in /proc/sys/net/ipv4/conf/*/rp_filter ; do echo 0 > $i; done This solved the problem and node2 could reply back over it's NIC to the other network without having to go back through the router.

Wireless BCM4312 3.2 kernel

Broadcom Chipset BCM4312

Since there is an Ubuntu package 'firmware-b43-lpphy-installer' which is up to date and will work against the 3.0 kernel, my earlier posts are obsolete. If you are not running Ubuntu, then you will still need to reference my post.

The latest 3.2 Linux kernel however has a few ABI changes, most notably in the network stack which effects the Broadcom's wl module. Most notably is: .ndo_set_multicast_list which was replaced with .ndo_set_rx_mode.

My specific chipset from lspci command:

Broadcom Corporation BCM4312 802.11b/g LP-PHY (rev 01)

Below is the error I get with v5_100_82_38 from Broadcom when compiling against Linux kernel 3.2:

bcurtis@zwartevogel:~/Downloads/wl$ sudo make KBUILD_NOPEDANTIC=1 make -C /lib/modules/3.2.0-030200rc1-generic/build M=pwd make[1]: Entering directory /usr/src/linux-headers-3.2.0-030200rc1-generic' LD /home/bcurtis/Downloads/wl/built-in.o CC /home/bcurtis/Downloads/wl/src/shared/linux\_osl.o CC /home/bcurtis/Downloads/wl/src/wl/sys/wl\_linux.o /home/bcurtis/Downloads/wl/src/wl/sys/wl\_linux.c:326:2: error: unknown field ‘ndo\_set\_multicast\_list’ specified in initializer /home/bcurtis/Downloads/wl/src/wl/sys/wl\_linux.c:326:2: warning: initialization from incompatible pointer type /home/bcurtis/Downloads/wl/src/wl/sys/wl\_linux.c:326:2: warning: (near initialization for ‘wl\_netdev\_ops.ndo\_validate\_addr’) make[2]: \*\*\* Error 1 make[1]: \*\*\* Error 2 make[1]: Leaving directory/usr/src/linux-headers-3.2.0-030200rc1-generic' make: *** Error 2

To get your wireless adapter working again:

  1. Download this patch: bc_wl_abiupdate.patch
  2. patch -p0 src/wl/sys/wl_linux.c < bc_wl_abiupdate.patch
  3. sudo make; sudo make install; sudo depmod; sudo modprobe wl

Give Ubuntu a few seconds after loading the "wl" kernel module, then eventually the Network Manager will start looking for wireless networks.

Chipsets supported by "Broadcom's IEEE 802.11a/b/g/n hybrid Linux® device driver" are: BCM4311, BCM4312, BCM4313, BCM4321, BCM4322, BCM43224, and BCM43225, BCM43227 and BCM43228.

Build environments using chroot

i386 or amd64

The need was simple enough: make deb packages from source for multiple architectures on the same system. This needed to be done without the overhead of a virtual machine and without using something like launchpad.

I've used chroot in the past and it seemed like a perfect fit for the problem. The idea is to have at least two chroot-able directories with the bare essentials from Ubuntu Natty (10.04) to compile and build deb packages. Here is a simple way to accomplish this: sudo apt-get install dchroot debootstrap sudo debootstrap --arch i386 natty /opt/chroot_i386/ http://archive.ubuntu.com/ubuntu sudo debootstrap --arch amd64 natty /opt/chroot_amd64/ http://archive.ubuntu.com/ubuntu sudo chroot /opt/chroot_amd64 locale-gen en_US en_US.UTF-8 dpkg-reconfigure locales exit sudo chroot /opt/chroot_i386 locale-gen en_US en_US.UTF-8 dpkg-reconfigure locales exit

The next step is to update your apt repositories and get the latest updates and upgrades. Overwrite /etc/apt/sources.list in your respective chroots with the following: deb http://be.archive.ubuntu.com/ubuntu/ natty main universe multiverse restricted deb http://be.archive.ubuntu.com/ubuntu/ natty-updates main universe multiverse restricted deb http://be.archive.ubuntu.com/ubuntu/ natty-backports main universe multiverse restricted deb http://archive.canonical.com/ubuntu natty partner deb http://security.ubuntu.com/ubuntu natty-security main universe multiverse restricted

In each chroot we update to latest packages and install our build environment. apt-get update apt-get dist-upgrade -y apt-get install build-essential

While you are setting up one chroot environment and you want to mirror the installed packages in another chroot, then you can do the following.

Make a list: dpkg --get-selections > installed-software

Use list to install necessary packages: dpkg --set-selections < installed-software dselect install

This should get you going for compiling and building in separate environments. This technique could also be used for non-debian based distributions as well.